Spring is such a great time of year. It’s the season when the cold weather is just a memory, the buds are out, and we can all start visualizing barbeques and dips in the pool.
It’s also the time of year for maintenance and adjustments to your sprinkler system to keep it in peak operating condition for the summer season. Proper maintenance of your sprinkler system will help to keep your lawn healthy and your water bill down.
The following steps are recommended for a trouble-free start-up of your irrigation system this spring:
- Clear away any vegetation, debris, gravel, or dirt around the sprinkler heads. Any broken or cracked ones must be replaced with the same model and brand within each zone.
- Reposition any sprinkler heads that are too high or too low.
- Straighten any leaning sprinkler heads.
- Check that the tops of the sprinkler heads are correctly angled for the slope of the lawn.
- Find the valve boxes, and thoroughly check the valve assemblies for damage
- If your system has been dormant all winter, remove the sprinkler head at the end of each zone to create a flush point when the system is first turned on. Any accumulated insects or debris will then be swept out.
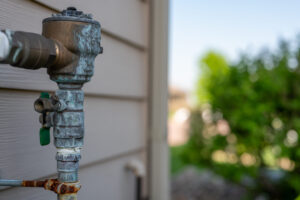
Your above-ground backflow preventer needs to be checked for any damage, even if you irrigated your lawn throughout the winter. After doing this, open the isolation valve slowly, and allow the pipes to gradually fill with water to help prevent water hammer (a shock wave caused by a sudden change in water flow, such as turning the water on too quickly, that can cause cracked fittings or burst pipes).
Check the controller to ensure it’s working and that it’s showing the correct time and date. If the controller has a back-up battery, it’s time to change it (this should be done every six months — in the spring and fall). Some of the high-end controllers have built-in battery chargers with batteries that last for years. The majority of newer controllers are equipped with non-volatile program memory and long-lasting batteries like the ones in your computer — you may never need to change them. During a power failure, these controllers will retain their programming, date and time.
If you didn’t run your irrigation system over the winter, run it now to sweep out any insects or debris that may be lodged in the pipes. Each zone should be run separately and long enough to thoroughly flush the system. Make sure water is running out the flush points you set up earlier. Replace the end caps or rotors at the end of each zone when you’ve finished flushing the system.
Now check your irrigation system to make sure each valve station is operating properly. Use the controller to manually activate each zone one at a time, and do the following in each station area:
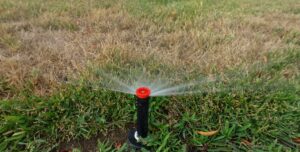
- Inspect for leaks in pop-up spray heads. For leaking sprinklers, clean out any debris, and tighten the caps. Replace any internal damaged parts.
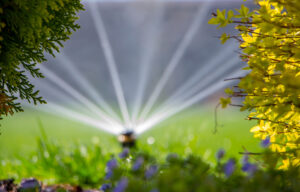
- Check pop-up spray heads for uneven gaps in the fan-shaped spray that could indicate partially blocked nozzles or filters. Clean any dirty filters. For nozzles, remove them and clean carefully. It’s sometimes faster to just replace nozzles, since they scratch easily, and aren’t expensive.
- Verify that the spray from one sprinkler overlaps the spray from the next spray head. If it’s too long or too short, turn the radius adjustment screw on the nozzle to change the spray distance.
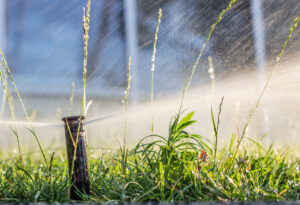
- Check that pop-up rotor sprinklers are rotating, and shooting streams of water the proper distance. If a sprinkler is no longer rotating, and the water flow has decreased, clean the filter. Replace it if cleaning doesn’t solve the problem.
- Make sure pop-up sprinklers are fully extended. If risers do not come up all the way, either the sprinklers are damaged, or debris in the sprinkler heads or filters is preventing them from popping up. Low water pressure could also be preventing the heads from rising. Ensure the valves on the backflow preventer are fully open, and that there aren’t any leaks in the water line affecting the water pressure.
- Make sure pop-up sprinklers are fully retracting. If not, clean out any dirt or debris caught between the sprinkler heads and risers. Check for worn-out seals, and replace them.
- Buy new sprinkler heads if the risers are broken.
- Check for broken or leaky pipes. Signs of this include: depressed ground areas, very soft or wet areas, and water bubbling up from the ground when the sprinklers are running.
- Examine the valve boxes. If you find water, check for water leaks between fittings, loose wiring, and worn parts.
- Inspect sprinkler heads at lower elevations. If they continue to drain after the system is turned off, install check valves, or replace with sprinkler head check valves.
- Ensure each zone is shutting off when your inspection is done.
- Make sure any sensors, such as weather, soil, and rain, are set up and working properly.
When you’ve done your inspection and maintenance steps, it’s time to set up the automatic watering schedule on your controller.
The do-it-yourself homeowner can do many of these spring tune-up steps. But for those who don’t have the time or expertise, hiring a professional is a good choice. A licensed irrigator can provide even more services, such as: electrical troubleshooting, controller replacement and upgrades, inspection of irrigation lines for leaks, sensor checks, water pressure checks, inspection of station control valves, valve closure checks, rotor head adjustment for arc and distance, spray head adjustment for proper head-to-head spacing, and water scheduling assistance for any area restrictions. As well, a professional can catch any potential problems during his visit, and provide solutions that will keep your system running trouble-free during the warm seasons ahead.
Call the experts at South Austin Irrigation at (512) 534-7449 or fill out our Service Request form for professional maintenance and repair to your sprinkler system.